

How to Create DIY Water Marble Nails with Orosa Beauty and Blogger Gabby Morris
/

While most of our fave nail salons are still closed right now causing us to crave our ritualistic “me time”, we’re now learning to find creative ways of doing our nails at home and to help ease our boredom. While we love some DIY action, we found a super cute and fun DIY water marble design that you can do right at home using Orosa Beauty nail polish and a little help from Blogger Gabby Morris aka (@gabbysnailart).
CRUSHING ON OROSA BEAUTY
Let’s first start with why we are currently crushing on Orosa Beauty nail polish. The formula is vegan and is missing 14 ingredients that they call their Nope List, which means the ingredients removed are considered unethical, questionable, and harmful. When applied, the color is opaque and long-wearing plus the applicator is wide for quick and even coverage. And it dries quickly which is sometimes not common in vegan nail polish formulas.
TUTORIAL TIME
Now, let’s move on to the super fun part of creating the Water Marble Design with these instructions.
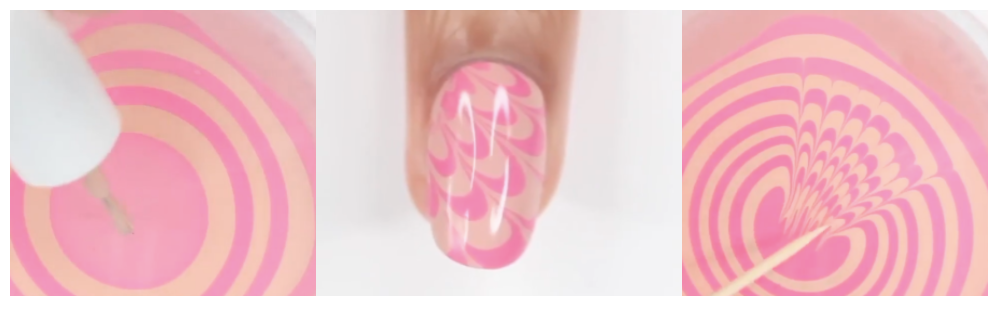
1. Apply a base coat of white, we recommend Snow Pure Cover Nail Paint ($12) -- this will help your marble design really pop.
2. Start by dropping Pure Cover Nail Paints (of your choosing, of course!) in the center of your cup of water to form a bullseye design. For creamy pink hues, we recommend Desert Rose along with Moon.
3. Swipe a toothpick through the water mixture to create any design your heart desires.
4. Dip your finger straight down in the water.
5. Clean off the excess Pure Cover Nail Paint.
6. And…voila! You have just created your marble nail art.
You can also find this tutorial here as a step-by-step visual on how to create this look. And, we also found it oddly satisfying to watch as well!
Orosa Beauty nail polish can be purchased online.


